Ok it's been awhile didn't post (Like yeah, a week....)
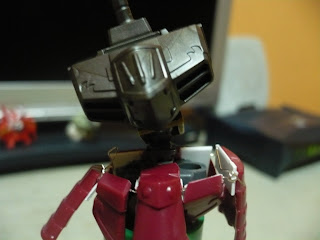
'Coz I'm abit busy though, but did do some mod using this as reference
 Yup, it's the waist mod, using the sangokuden's arm parts as the waist joints. See that green parts inside the body ? I also did on my extra Sousou kit..
 There. Cut here & there, slap some superglue & voila ! I have a moveable waist on Sangokuden kits now. =)
 Can bend left...
 ....& right ~
 From side view, bend backwards. Doesn't look much different with normal stance. But.....
 ....it's too obvious when bend forward. =D
So before we continue, commercial break. =)
~
~
~
~
~
~
 ~
~
~
~
~
~
~
*adding colors*
 This is how it look now.
 As you can see, I re-do the whole waist with pla plate, painted it with burn metal gundam marker..
 ..& this is the lower waist parts.
 Haha... Still in early process, so it might look weird now...^^"
Now I need to think of some ideas to continue this kit.....
'Coz I'm abit busy though, but did do some mod using this as reference
 Yup, it's the waist mod, using the sangokuden's arm parts as the waist joints. See that green parts inside the body ? I also did on my extra Sousou kit..
 There. Cut here & there, slap some superglue & voila ! I have a moveable waist on Sangokuden kits now. =)
 Can bend left...
 ....& right ~
 From side view, bend backwards. Doesn't look much different with normal stance. But.....
 ....it's too obvious when bend forward. =D
So before we continue, commercial break. =)
~
~
~
~
~
~
 ~
~~
~
~
~
~
*adding colors*
 This is how it look now.
 As you can see, I re-do the whole waist with pla plate, painted it with burn metal gundam marker..
 ..& this is the lower waist parts.
 Haha... Still in early process, so it might look weird now...^^"
Now I need to think of some ideas to continue this kit.....
=)


